Sunday 24 November 2019

SYW Right Flank of the Battle of Kolin

23 Nov 19

The battle was a loose interpretation of the fight for the right flank of the Battle of Kolin on18th June 1757, fought between the Prussians and Austrians.


Reference:
As this was a 2-3 hour battle and on a 6'x4' table I desided to only fight the action on the right wing of the battlefield, centred around the village of Kutlire.  I played the Austrians and my friend Mark, commanded the Prussians.  I didn't have time to prepare historically realistic unit lists.  Instead I created a battle field with the some of the key terrain, including the villages of Kutlire and Krzeczor and the rough, hilly ground between them.

As per the real battle I place a brigade of Grenze light infantry into the rough ground and placed a brigade of Austrian German infantry to the east (right flank) of Kutlire.  I placed a Grenadier Brigade with Horse Grenadier support as a central reserve.
Grenze holding the village of Kutlire


The Prussians had three Infantry brigades, one of which was elite and 4 regiments of cavalry, two cuirassier and two hussar. The two sides had roughly equal infantry but the Prussians had a cavalry advantage.  The Austrians however had the advantageous terrain.

For the Prussians to win a  victory they had to capture the village of Kutlire (in the centre of the table) and cut off the Austrian ability to reinforce the main Austrian Army (who are off table to the Austrian left.)

For this battle I wanted to test using one 60mm stand for each unit using the Black power rules. The scenario rules brought a SYW flavour to the battle.  Click on the link for the unit stats for the armies.

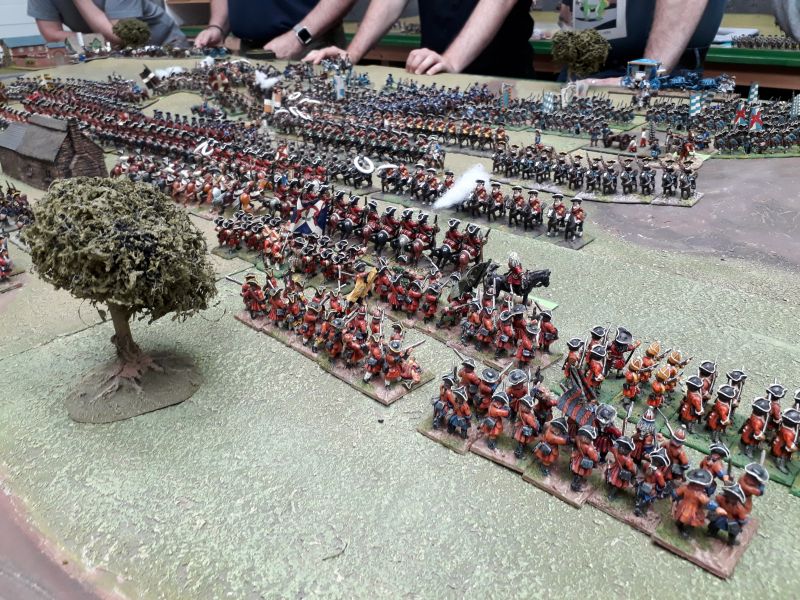
Austrians are on the left of the pictures, Prussians the right.


The battle started with the Prussian Cuirassiers making a huge flanking movement (triple move) around the Austrian right flank, the Prussian left advancing and the rest of the army going backwards (blunder) or standing still.
In the second turn the Cuirassiers charged into the flank of one Austrian battalion driving them back and then charging and driving back a second battalion before retiring themselves in good order.  The infantry on the Prussian left advanced to point blank range and opened fire to little effect.

Cuirassiers charge home on the Austrian right flank

The fight on the Prussian left was not going well for the Austrians., The Prussians occupied half of the village.  Meanwhile on the Prussian right flank their Elite brigade continued to refuse to advance and instead swapped a few shots with the Austrian Grenze.
Austrian infantry brigade starts to break

It was time for the Austrian reserves...
Austrian Grenadiers and Horse Grenadiers

The Austrian reserve marched to the relief of the right wing. During the ensuing fight, a unit of Horse Grenadiers charged the Prussian infantry brigade occupying half of the village.  Heavy cavalry v 3 battalions in line, what could go wrong...so that was the end of that regiment.  A similar lesson on the Prussian side was an infantry battalion bayonet charging  a battery of artillery...so that was the end of that battalion.  In the end the Austrian reserve managed to drive back the Prussian assault.
However the Prussian elite brigate had managed to drive the Grenze off the high ground and force them back into the woods.

Grenze in the woods, Prussians on the high ground

This gave the Prussians the high grounds overlooking the half of Kutlire village still held by the Austrians but the light was beginning to fail.  The Prussians had time for one assault on the village.  If they captured the village it would be a Prussian victory.  If they failed an Austrian victory...

The Assault!
The  Elite Prussian forces fought hard but Austrian Grenze defencing the high walls of the fortified farm house held on.  Darkness fell over an Austrian victory.

After Action Thoughts

  • It was a great game.  I though the battle was all but over in the second turn when the Prussian Cuirassiers flank charged the Austrian right.
  • Using one 60mm base per battalion or cavalry unit worked very well.  It allow for manoeuvring  room on the table (6'x4'). Due to the period it's not so important that we can't depict columns and squares as easily as you can with multiple bases.
  • The Black power rules are fun and we are getting quicker to play them as we become more familiar with them.
  • One change we will make if to bring in a rule similar to that suggested in Age of Eagles where Cavalry may opt to charge any unit, to their front, moving into proximity range (12cm).  The rule will allow infantry more move into musket range without provoking a charge but closing to point blank range may provoke a charge.
  • I personally got a great kick out of refighting part of an actual battle, even if it was a loose interpretation.  In hindsight maybe I should have given the Prussians more troops to offset the advantage of the Austrians starting in the village but I'm not sure that would have helped them.  The main reason the Prussians lost was their inability to get their Elite troops up onto the high ground to attack Kutlire until the last turn of the game.


Saturday 23 November 2019

SYW trying our 60mm wide bases with two bases per Btn/Reg

09 Nov 19

This was a pickup encounter battle between Prussians and allies v Austrians and allies, played with my friend Paul.  The aim of this battle, other than fun, was to try out Black Power rules in 6mm with each unit having two bases, 60mm in width.


The Battle

The battlefield had a few interesting features,  See Scenario rules for SYW including rough ground and linear obstacle hedges.


The Austrian centre stormed forward in to Prussians.
The rest of the Prussian left wing held back
The assault on the centre failed and the brigade broke.  The left flank became embroiled in a heavy fire fight, which the Austrians won.
With the left won by the Austrians and the centre by the Prussians it all hung on the cavalry battle on the right wing...which the Prussians won, thus winning the battle. 

Lessons Observed 

1. Turn sequence:  Moving then firing encourages more aggressive play.  When the sequence is shoot then move, players are encouraged to sit in defensive positions which is a problem if the scenario dos not have an aggressor. 
2.  Movement Distance: Moving in CM rather than inches works well in 6mm on a 6'x4' table.
3.  Unit size: Two bases per unit works fine but does not add any special value in a SYW battle where everyone is in lines.
4. SYW Black Power Scenario rules: The BP Scenario rules worked well. It is a pity we didn't get some Infantry v Cavalry combat.


Friday 8 November 2019

Second Battle of the Boudica Campaign

26 Oct 19
This was the second battle in the Boudica Campaign. It was a much bigger battle with four players, each commanding two commands, with each army being 204 point To the Strongest armies.  We used the new TtS lists which give the Britons battle chariots rather than light chariots.  From my understanding of the period the chariots should maybe act more like dragoons, taking warriors to the enemy's lines and providing an escape route if it all goes wrong.  One the whole the addition of chariots is a great improvement to the army lists.


For those of you unfamiliar with the period this battle was a major defeat for the Romans.

"The victorious enemy met Petilius Cerialis, commander of the ninth legion,..., routed his troops, and destroyed all his infantry. Cerialis escaped with some cavalry into the camp, and was saved by its fortifications. After this defeat, Catus Decianus fled to Gaul."


The scenario for this battle called for a Flank march by Britons. (The campaign rules can be downloaded here.)


This was a big battle fought on a big table.


The British left command was entirely mounted troops.  Two light cavalry units and two chariot units. There roll was to tie up the Roman right.
The British centre, warriors and slingers, supported by light cavalry and chariots, were to press forward slowly. Wearing the Roman's down with their numerical advantage over the Romans in missile troops.
The British right flank, fanatical warriors, was the flank march.  Their role was to surprise the Romans and attack the unprotected Roman flank.
It was a good plan but... the Romans refused to be drawn off their defensive position and turn after turn the flanking force refused to advance on the Romans.  Curse those cards!  
(BTW: These are 15mm figures. We just use small cards :). )
The centres engaged. The Brits, showing the IX Legion the traditional British sign for victory!


However as the fight progressed the Warriors were ground down by the Legions. British warriors are the same point cost as Roman legions but can't stand up to them toe to toe. The Roman's better saves keep them in the fight and although the warriors have three hits once they are disordered they start to loose the fight.

Alas we were unable to fight the battle to it's conclusion but at the time we stopped the Romans were winning 6VP to 2VP. I had forgotten that two of the generals were new to TtS and explaining the rules (and general chatting) took longer that I had expected. Next ...the final battle. Who will have victory? Roma or the Iceni?


Sunday 20 October 2019

Testing for Unit scale

Unit Size


It my previous post I raised the question what size units to use to fight my Seven Year War battles. I have my figures based on 40mmx30mm wide bases and my thought was is it better to use one base as a unit (Battalion) or whether it is better to use two bases?

One Base per Unit

With a singe base as a unit my armies are double in size to the two base per unit option and my battle field is twice as wide.  Assuming a Battalion is about 150yards wide when deployed in line, with a 40mm wide base, this results in 48cm being roughly a mile.  This means my wargaming table is three and a half miles wide and a mile and a half deep.  This would give me space for most battles.

One issue with the single base option is it's hard to show formation.  I'd have to assume that units were in the best formation for them, line, column or even square.

Visually a single base with 24 figures looks OK.

Two Bases per Unit

Using the calculations above, double base units reduce my battlefield (table) to just under 2 miles wide and a mile and a bit deep.  Still not a bat size, especially if I'm not fighting battle with 60,000 per side.

Two bases allow me to show formation, line (side by side), column (one behind the other) and square (back to back).

Visually 48 figures looks better.

Trial Battles

One base per unit


It was a small encounter, 8 Prussian battalions in two brigades with 4 cavalry brigades v's Austrians in the same strength. Prussians are on the left of the pictures. The smaller unit scale let me field more units from my still growing figure collection. I liked to look of the larger number of units.
Although I was only using a single base for a unit, 24 figures seemed enough to give the feel of a battalion.

Two Bases per unit

It was a small encounter, 4 Prussian battalions with two cavalry brigades v's Austrians in the same strength.  Prussians are on the left of the pictures.  I liked the feeling of weight the double bases gave to the units.

This is wear I learnt there is a reason to advance infantry in line with support.

A victory to the Austrians.  The units were too spread out but gave the battle a visual appeal.

Conclusion

Both options are viable.  I'm leaning towards the double base units but I need more figures.  The battles did raise an interesting question - is there something I can do with the basing to differentiate the cavalry better, such as open order for Hussars?

Sunday 8 September 2019

Boudica Campaign

07 Sep 19

I'm relatively new to "To The Strongest" (TtS) and up to now I've been playing with various substitute figures while I get the feel for the rules and various armies.    After a lot of painting and basing I've build up both early Imperial Romans and Ancient British armies.  (I've also created Sarmatian army for a future Dacian/Sarmatian wars with Rome project.)


I decided to start off as I mean to go on and dive straight into a linked battle style campaign as opposed to one off encounter battles.  Rather than a complicated system of off table map manoeuvres and supply management, the campaign is a series of linked battles intended so that each can be played with any number of points/players.  There is in a minor bonus to the loosing side to give them a boost in the next battle.

The campaign rules can be downloaded here.

The first Battle
Coordinating a number of players proved a challenge due to holidays etc, so I decided to kick off the campaign  with a 1:1 battle with my friend John.  The battle was fought on his large 12' by 4' table, so with 10cm boxes the battlefield was 24 boxes wide. No secure flanks! Just how it should be.

The forces on each side were 4 commands with a total of 170pts each.


  • Praefectus castrorums - Tulius Octopus
    • 3 Veteran  Legionaries cohorts, 
    • 1 veteran Bowmen 
    • and a camp with Camp servants.
  • 1st Tribuni 
    • 4 Cohorts of Legionaries.
  • 2nd Tribuni 
    • 2 auxiliaries & 1 veteran cavalry.
  • 3rd Tribuni
    • 2 auxiliaries & 1 veteran cavalry.
  •  Iceni Chieftain - Eóin Dalta
    • 2 fanatical bands of warriors
    • 3 bands of warriors
    • 1 band of sling armed youths
    • and a camp with Camp followers.
  • Iceni Scouts
    • 4 light cavalry
  • Trinovantes Chieftain
    • 5 bands of warriors
    • 1 band of sling armed youths
  • Trinovantes Scouts
    • 4 light chariots

The scenario called for an ambush by the British which means each Roman unit had to test to see if it was disordered. Almost the whole roman command turned out to be disordered.

The British advanced but the cowardly Trinovanties warriors held back fearful of the Romans.

Despite being disordered the Romans advanced planning to deal with the Iceni warriors before the Trinovanties  found their nerve, intending to address their order as they advanced.


The Trinovanties light chariots were maned by braver warriors than their foot and charged recklessly across the battle field, flanking and enveloping the Roman right wing.  I was amazed to see 4 light chariots destroy 3 roman units for the lose of just  2 chariot units.

The Roman left followed the battle plan and broke the Iceni Cavalry and the slingers, driving them back and killing three out of four.


The centre was where the battle was going to be won or lost.
The Roman veterans destroyed the Iceni warriors.  However the overall battle was close. The Romans had 2 VP left and the British 3 VP.  The Romans had a three cohorts try to destroy one  double disordered warrior warbands but failed every time.

The Trinovanties shamed by the fearlessness of their light chariots charged across the battle field and slammed into the Romans with little to no effect.  

The victory looked to be Roman but then one of the light chariot units slipped around the woods and into the flank of a disordered veteran legion and rode Rome's finest into the ground.  
VICTORY for the British!!!  17 VP taken  to 14 VP lost

After Action Report by Tulius Octopus, Roman Commander
We was robbed...I was distracted trying to buy tickets for the circus and allowed myself to get over confident.  Those British Light chariots and cavalry were far more dangerous than I expected.  A more compact formation with stronger flanks would have been a better formation.

The Ninth legion are on their way north and will crush the British in the next battle!.

The Game
It was a fun battle.  I was commander of the defeated legions and my friend John the victorious British.  It was a very close battle with both of us just needing to destroy one unit to gain victory.  It was the first time we remembered to check for Generals as casualties and the loss of the Roman commanded on the right wing was a blow.  I made a mistake in the rules telling John that Light troops could not charge the front of formed heavy troops but allowing him to charge the front of disordered heavy troops.  To be honest I don't think it would have changed the result of the battle. His light troops were running rings around my flanks.

The Warriors did seem weak compared to the Roman legionaries but we have a few more battles to test this theory.

The next battle is the encirclement of the IX legion and the Romans will have 3 extra heroes.


Sunday 1 September 2019

SYW using Blackpowder

When starting a new period there are a few key questions to answer:
  1. What period?
  2. What scale?
  3. Which rules?
    1. Any customisations?
    2. Are there options with unit size?

I've always had a soft spot for Austrians in the Seven years war (SYW).  I think it's because they were one of my first horse & musket armies.  My friend Paul and I use to wargame on a little table in a very small studio flat, when I first got married  30+ years ago.  Recently I got the opportunity to rebuild my  SYW armies and decided to build up both Austrian and Prussian forces in Baccus 6mm.

Once I'd decided on scale and period I had to find some rules.  I'd heard a few good things about Black Powder (BP)and I knew they had a supplement "The Last Argument of Kings" which covered the period.  I also had John, another friend, interested in Napoleonic.  As BP covers both periods it seems a good choice to provide a common set of rules, only requiring period specific customisations.  Lucky I was signed up for a BP weekend at the Wargames Holiday Centre, refighting the battle of Blenheim, which would be an excellent way to check out the rules.

Reading through the various BP Napoleonic supplements, Albion Triumphant and Clash of Eagles, I came across a points system for BP which is handy for balancing pick-up battles.  It wasn't too difficult to work how to apply it to the SYW (with a few guesses).

Like all wargamers  I was unable to resist putting my own spin on troop statistics and cherry picking the various supplementary rules I liked, resulting in a set of rules which felt right, to me, for the SYW .

My Seven Years War – Unit Statistics & Point costs for Black power
My Seven years War - Scenario Specific Rules

The next question was how big would my units be?  I'm a fan of big battles and battalions which look like battalions and not an understrength platoon. But this needs to be balanced against playing space, cost of models and time to paint them. I decided that the way forward was to fight a number of  proof of concept battle to check if my proposed customisations  played as well as I though they would and which size units to use.


Thursday 29 August 2019

Making Terrain

Aug 2019
When I started wargaming with other people in about 1977, I was lucky enough to be with a club, The Farnborough Wargames Society. One of the many benefits of playing at the club was the large boxes of terrain available to all on any club night.


Recently I have returned to table top gaming after many years of roleplaying games and I realised that if I wanted to play at home I'd need some terrain.  A couple of hills and a few trees were a simple purchase but if I wanted roads, fields, hedges, walls etc then maybe DIY was the way to go.  I'd always wanted to have a go at making terrain but never had the time or need.

Lucky the internet is full of "how to do it" web sites. As I was thinking 15mm and 6mm terrain I found the "Grand Tactical Battles in the American Civil War"  web site full of very interesting ideas.

Hedges:
I started by creating some hedges from green scouring pads, some thing I'd read about in the 70's or 80's.  They look a little blocky and cultivated but they are usable.  Then I tried using Woodland Scenic clump foliage.  I think this gives the best hedges although they are more like a line of small trees in 6mm.

Walls:
I'm rather proud of my 6mm wall because it was my own invention.  It's a row of matchsticks painted grey.
6mm Austrian SYW by Baccus with terrain


Fields with Hedges:
There are carpet tile off cuts with the hedges above.

Woods:
The woods are straight off the "Grand Tactical Battles in the American Civil War" site.  Cocktail stick trunks into a foam board covered in Woodland Scenic clump foliage.
15mm Essex Celts with terrain

Roads:
Once again I followed the ACW site's lead and I made some roads using building caulk.  I was sceptical but it worked.  Sure the roads are best for 6mm and are a little rough but they are good enough.

Battle field with terrain including some roads.

All in all I'm pretty happy with the results.  I wouldn't want to spend much more time on terrain opposed to figure painting but  it was fun.  I can't help but think, I could do with some rivers and marshland...

Monday 26 August 2019

Battle of Blenheim at the Wargames Holiday Centre

Aug 2019

Back to the Wargames Holiday Centre (WHC) for a refight of one of the major battles of the War of Spanish Succession (or Marlburian wars as I called them as a school boy).  
There were 8 players over the weekend, myself and 4 friends and 3 others, all of who I'd happily join in with again.  One of the reasons for choosing a "public" game was to play with others more experienced with the Black power rules (and after my earlier fun experience this year at the WFC, to meet more wargamers)..

I expect that many wargames will have some knowledge of the battle but in case it's new to you...it was in Aug 1704 , our refight was the 315th anniversary.  The French, Bavarians and their allies vs the Imperials (Austrians), English and their allies.  I say English as the act of union with Scotland was still 2/3 years away.

The French were the finest army in Europe and were therefore rather shocked when John Churchill (the future Duke of Marlborough)  attacked across the Nebel river.  The French-Bavarian line was flanked by two towns (Lutzingen & Blenheim) with a third Oberglauheim in the centre.

The assault on the two flanking towns ended in a stalemate for much of the battle and the battle hinged on the encounter in the centre between the English and the French.  To be fair it's often not mentioned that the French cavalry had been infected with Glanders which is a serious horse disease. The Finest cavalry in Europe the French Gensdarmes met the English horse and were defeated.  After that it was all down hill for the French.


So much for the history... over the weekend we fought the battle twice, each of us getting to command both sides.  The first battle was a learning curve for us all. We were using WHC house rules for WSS and Black power 1.  Unfortunately my friends and I had all read/played version 2 and there were a few key differences.   Still it was a good battle and due to a blunder the entire French centre's cavalry charged the British centre. They lost but it took long enough for the French to start to win around Lutingen, aided by the fact it took hours to winkle the defenders out of Oberglauheim. We called it a winning draw for the French.

24' of battle line

Traffic jam trying to cross the Nebel

My Dutch assault Oberglauheim


The colours captured by the Dutch

Just a few figures...

The second version of the battle was much better planned and run.  The defenders of Oberglauheim  were shot out of their fortification in a couple of turns and the French left got suck into a major fight swinging backwards and forwards. The British centre made a very controlled advance into the centre against the Bavarians.  In the right centre the French cavalry held back giving the guns and infantry a clear shot at the attacking Dutch troops. Two attacking brigades of Dutch were shot off the French line and retired from the battle field.  The British ignored Blenheim which was a good move.  Once again I'd call it a winning draw to the French but another one or two turns would have seen a major battle in the centre which would have swung the battle one way or another.

The Bavarians wait on the English assault


My French have already driven off two assaults


As when I played at the WHC in March, Mark Freeth was an excellent host, remembering everyone's names and keeping us supplied with drinks, sandwiches and cake.

It's a big table, this is just half


Black power gives a nice speed to the game and the mechanics are easy to learn.  The house rules added flavour.  I think I prefer pure "The Last Arguments of Kings" supplement for WSS and SYW but I was happy enough with these rules.  It certainly did not feel like a Napoleonic battle. It's always interesting to see in these big battles how they break down into a series of more local fights and an army that is winning on one flank can be getting creamed on the other.  There is a lesson here that we can all use when we want to fight a big battle but don't have the time, space or troops. It's possible to fight one or more sections of the battle on its own. For example in this case the assault on any of the towns could be fought in an evening or maybe even the battle for the centre.