Sunday 20 September 2020

Solo  Ottoman Empire vs Austrians - early 18th Century


This was a solo  fictional battle set around the time of the Austro-Turkish War (1716-1718). This puts it after the War of Spanish Succession (1701-14) and before the War of Austrian Succession (1740-48).

One of the challenges of a solo game is surprising yourself.  I have tried various systems which generally boil down to rolling a die to choose a flank to attack etc.  In one of Facebook wargaming sites I saw a reference to a book "Programmed Wargame Scenarios" by Charles S Grant, published by Caliver books, so I ordered a copy.

I have just finished paining an C18 Ottoman Turk army and was keen to try them out.  I chose scenario 1 - Hill line defence and put the Ottoman's in to defend.  I have read that the Ottoman's were bold strategically but very defensive tactically so having them defend seemed in keeping with this tactic.

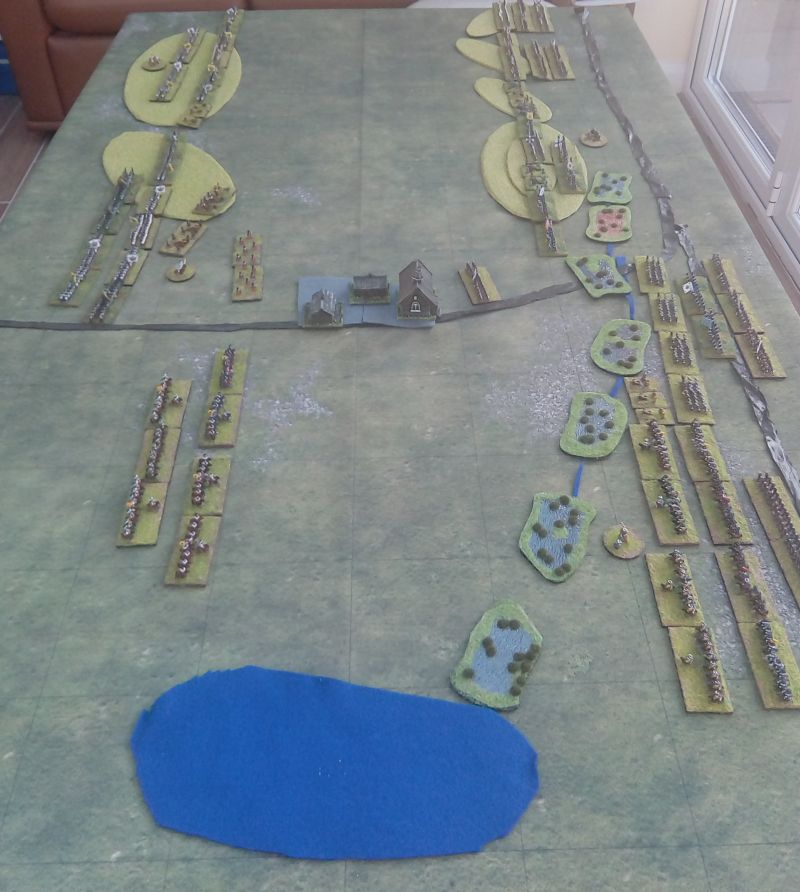
I chose to play the the Austrian attackers and to let the scenario run the Turks.  I set up the Austrians is a conventional style, two cavalry wings with two lines of infantry in the centre.  Their goal was to capture the hills at the far end of the battlefield.

The battlefield as the Austrians saw it.
Centre

The battlefield as the Austrians saw it.
left


Returning to the scenario I then saw that the defender's map was a little different and there was a farmhouse and a long defensive wall right in the middle of the Turkish position.  This was a nice twist and greatly added to the fun of the battle.

My plan was for the cavalry to drive off the Turkish cavalry and for two brigades to loop around the right flank and assault the flank of the farm and for two brigades, including a Grenadier brigade) to pause and then assault the  farm front while the flank was engaged.  The plan was for the grenadiers to lead the final assault.

The Turkish deployment was controlled by the scenario, 50% in the centrem a strong right wing (35%) and a weak left (15%).  The Janissaries held the farm and wall in the centre, the Arnaut (Balkan) infantry and skirmishers were poised to take the village and Sapahi (armoured cavalry) with Akinci (raiding light cavalry) were on each flank with a central reserve of elite Kapu Kulu Sipahi.
The Janissaries and artillery deploy in the farm


The view of the farm from the Austrian Centre


My reading on on the Ottoman Turks lead me to believe that they had poor command control and except for the Janissaries the bulk of their army was irregular conscripts and volunteers.  They tended to lose battles unless they had a significant advantage in numbers.  (In my next blog I'll throw a few doubts into this.).  I therefore gave stats to the ottomans so that the janissaries were worse in a firefight than the Austrian infantry but better in melee.    I have read that in the SYW, Austria Grenadiers and Hugarian troops were armed with sabres and copied Janissary tactics - the forth rank would draw their sabres and wrap around the flanks of Prussian infantry during a melee. The Sapahi (armoured cavalry) were like feudal knights. individually good horsemen and brave but they didn't have the months/years of practice in charging knee to knee had be the regular Austrian cavalry.   I made them good cavalry but without the charge bonuses of regular cavalry.

The BlackPower rules  stats I assigned to the armies are here.

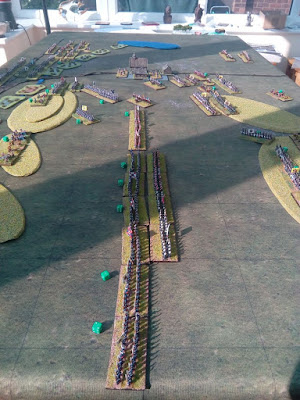
The cavalry engaged on the flanks and although the Austrian cavalry won most of the fights neither flank ended in a conclusive victory.  The battle would be decided in the centre.

The frontal assault on the Ottoman Farm was crushed. Only one Grenadier battalion managed to charge into contact the rest were stopped and then broke.  However the flanking attack was more successful.  The Austrian troops engaged in a long firefight. The Austrian musketeers were better drilled but the Janissaries had cover.  One Austrian brigade broke from casualties but the 2nd brigade took over the firefight and the Ottomans took so many casualties that they then broke.  The farm was taken although the Austrian lost 3 out of 4 infantry brigades doing it.  Only the fact that they still had 3 out of 4 cavalry brigades kept the whole Austrian army from breaking.

The assault on the farm just before both brigades attacking the front broke. 

The Austrian flank firefight observed by the CinC and his mistress (in the red coach).


Alas it was all, too little-too late, for the Austrians and although they had taken the farm and could have probably won any subsequent battle for the hills, they had run out of time.  The battle was a victory for the Ottomans as they had held the hill line until nightfall. (Under 18th century rules the Austrians claimed it as a victory, as they held more of the battlefield at the end of the battle than at the start.)

References:
  • Osprey Men-at-Arms Armies of the Ottoman Turks 1300-1774
  • Osprey Men-at-Arms Armies of the Ottoman Empire 1775-1820
  • Century of the Soldier - Peter the Great Humbled - The Russo-Ottoman War 1711
  • Caliver books - Programmed Wargame Scenarios

Friday 3 July 2020

Battle of Mollwitz 1741 – Post of Honour Review


The Post of Honour rules are by Keith Flint who is also the author of the  Honours of War rules published by Osprey.  Both sets of rules are for the Seven Years War – 1756-63.    The rules are supported by an excellent honoursofwar.com  http://honoursofwar.com/  forum which contains modifications for fighting the War of Spanish Succession (WSS), War of Austrian Succession (WAS) and others around that period sometimes called the lace wars.

 As I game this period in 6mm, I use the standard polemos basing of one 60mm x 30mm base per foot battalion/ cavalry regiment rather than several smaller bases. 

 For my first use of POH  I chose the WAS  battle of Mollwitz in the WAS.  Far better men than I have provided detailed analysis of the battle, so I’ll just point you towards,  Obscure Battles http://honoursofwar.com/, Wikipedia https://en.wikipedia.org/wiki/Battle_of_Mollwitz  and British Battles https://www.britishbattles.com/frederick-the-great-wars/the-battle-of-mollwitz/ (not that any British troops were present).


I fought the battle solo, due to lockdown and found the rules easy to read and remember.  Having previously used the HoW rules  was an advantage as the command and control and / manoeuvre rules are similar. 

The turn sequence  starts with alternative movement phases but then has simultaneous firing and melee phases.  On the whole, this worked fine.  I’d suggest that firing is calculated in groups of units for both sides rather than all of one side and then all of the other, by which I mean Austrian battalion "A" shooting at Prussian Battalion "B" and then the reverse, rather than all of the Austrians then all of the Prussians.    This helps when you are trying to remember whether a battalion was weakened before this round of firing or during it.

Units can take a number of hits before they are weakened and take penalties in their firing and melee.  After further hits units are destroyed.  The rallying rules are very important.  Having reserves who can march forward past the 1st line to “shelter” them and allow them to rally, is key to success.

In retrospect Mollwitz may not have been the idea battle to test the rules as I halved all movement distances in order to simulate the 2’ deep snow on the ground that April. (Mollwitz is in modern day Poland and it was a cold year.)  The half speed movement increased the effectiveness of firing as troops could only approach to charge range slowly.  This was awkward for cavalry who were unable to change from outside of musket range and had to take twice as much fire when charging infantry.

 Overall, I felt the battle has a period feel to it and the result was a near perfect  recreation of the actual battle.

The Battle

The left flank of the battle field has two small river and three small villages.  In the actual battle everything was under 2’ of snow.

The empty battlefield


Some of the buildings


The Prussian forces were squashed on the plain with small cavalry forces on each flank.  Two gun batteries were situated before the battle lines.  One feature I like about the PoH rules is the pre-battle bombardment phase.

Prussian Deployment


The battle started with the Austrian right wing  moving on the flank of the Prussian line.  In retrospect with the slower movement they would have been better off just going straight ahead at the Prussians as they had both a numerical and quality advantage.

Flanking Austrians


The Austrian left and Prussian right wings clashed in a mass cavalry brawl.  The Prussian Carabiniers were lead by the king himself. (As per the actual battle.)  True to the real battle the Austrian cavalry whipped the Prussians and Frederick had to retire to the infantry.

In the actual battle the two Prussian grenadier battalions formed square.  The PoH rules seemed to lack this ability.  

A four way cavalry fight. (Quite easy to calculate)


The two battle lines slowly closed on one another while the Prussian grenadiers on the right flank  held off the Austrian cavalry.

 The Austrians were at a disadvantage firing using the old volley fire system and wooden ramrods and the Prussian infantry blow chunks out of the Austrian battle line.    The Austrian 2nd line had been drawn off to protect their right flank which prevented the Austrians rallying as easily as the Prussians.  

The Infantry advantage lay with the Prussians in both quality and quantity. 


The Austrian battle line broke, just as they did in 1741 and the battle was lost.  The Austrian cavalry had won both wings but were unable to swing the battle in the favour of Austria.


I fond the Post of Honour rules gave a reasonably quick battle; a nice period feel and gave a historically accurate result.  (To be fair I’d have been very worried if the Prussians had lost.  They had over 50% superiority in infantry who were better equipped and trained than the Austrians.


Wednesday 1 July 2020

Domstadl – 30 Jun 1758 – Seven years War a Lockdown Experiment

This battle was a lockdown experiment.  The two generals both played remotely and had to rely on written notes from their subordinates and pictures representing what they could see (or described by their subordinates).

I issued briefing packs to both generals and then interpreted their orders as best as I was able and allowing local commanders to apply their initiative.  The game really brought home to me how little information generals had to work from, especially as these were the days before efficient general staff.  

In a normal game generals have perfect helicopter vision even in battles spread over 2000 yards or more.  It’s also difficult to truly surprise a player unless you have an umpire occasionally throwing a spanner in the works.  This battle had very limited visibility, a time lag when transmitting orders and very strong "fog of war".

The Briefings for the players:

             Prussian briefing

             Austrian briefing

•             Map provided to the generals

             Blackpowder unit stats (not shared with the players)

For those interested in the actual battle see: http://www.kronoskaf.com

My original intention had been to publish all of the exchanges of orders but a combination of my poor record keeping and trying to pull messages and pictures out of Google Messenger has made that just too hard.

 To give you a flavour of the game…the original Prussian orders were:

 Orders: From Prussian: Lt General of Cavalry Hans Joachim von Zieten


•             Col. von Tresckow to reform his brigade and rally/organise where possible, forming line to face the emerging Austrian bgde.

•             Col. von Bahr to rally/organise his bgde and support Carlowitz bgde.

•             Carlowitz bgde to form line and face the Austrian horse.

•             Prinz Ferdinand bgde to flank convoy and prepare for enemy Hussars.

•             Col. von Kyau to tail convoy.

•             Col. von Werner to move into gap between Kyau bgde and Prinz Ferdinand bgde on rear right flank.

•             Convoy to organise and attempt to resume moving towards Domstadtl in 3x4 wagon column.

•             Rath bgde to advance towards outskirts of Domstadtl halting at 150 yrds prepared for enemy fire.


Some pictures as the battle unfolded 

The Prussian Camp at Altlibe, looking to the high ground to the east and the scouting Prussian hussars.


The waggon train setting off

Messages back to  Lt General of Cavalry Hans Joachim von Zieten

Message from Brigadier General Tresckow

Sir, we have reached the bridge south of Altlibe .  The men’s spirits are high. We are singing good stirring Prussian hymns. Not even the rain, which is getting heavier, is dampening our spirits. I intend to cross as per your plan.

V.Tresckow

p.s keep my son busy as your ADC.  Lots of hard work will do him the world of good.


A dispatch  by Hussar

Sir, no enemy yet in sight.  The road to Ober Gundersdorf remains clear.  I can see that several waggon trains remain parked in the lager as the road south is congested with the rest of the train.

Col v.Werner


And later in the game …

Brief to  Lt General of Cavalry Hans Joachim von Zieten

No sooner do your couriers leave when the sound of scattered musket fire is hear from the head of the column. A small brigade of Austrian Grenze have ambushed the Tresckow brigade. V.Tresckow is wheeling his brigade into line.  The Grenze officers are waving their men back to the woods.  Some of the waggons are scattering, some trying to form a three wide column.  One waggon is stuck on the bridge going the wrong way.


 Lt General of Cavalry Hans Joachim von Zieten orders in response...

Tresckow brigade to engage with Grenze.  Do not pursue beyond the column front.  Make all attempts to reorganise the wagon train.  Bahr brigade to advance on the Grenze flank in support.  Once able to contact, Tresckow brigade can return to the advance on Domstadtl with Rath brigade.


Ambush by Grenze!


Then more Austrian regular infantry, then cavalry and guns


It's all going a bit "Pete Tong" (Pete Tong = wrong for those who are not familiar with Cockney rhyming slang).


The main Austrian force arrives over the hill at Neudofel and engage the northern half of the waggon train who have yet to cross the bridge.


In the end the Prussians managed to just hold off the Austrian army in the north at Neudofe and the Prussians in the south were able to steamroll the Austrians in the south at Domstadtl.  

However the Austrian hussars did leave burning waggons scattered across the battlefield.


Conclusion

All in all, it was a very interesting way to fight a battle.  Both Generals only had a broad idea what was going on due to lag between orders and briefings back from their subordinates.  The generals did things like relying on their intelligence briefing; e.g. the Prussian commander guarding against (non-existent) Austrians from Gundersdorf but not throwing out scouts to Barn in the west and therefore being surprised when an Austrian force crested the hill at Neudorfel.

 The Austrian General struggles with the technology and took a while before he could see the photos.  Once he was able to catch up, things got rolling.

 It was a very close run battle and the Prussian Plan to surround the waggon train paid off.  The players were surprised by the size of the waggon train which was 13 x 6cm waggons. It’s size caused challenges for the defenders and left gaps the for Austrian hussars to do what hussars do best and raid.  However, they were too light to be able to stand up in the face of formed Prussian infantry.

 Final count

  • 5 waggons saved by the Prussians.
  • 2 damaged, crewless waggons rescued by the Prussians

 Total 7 saved out of 13

  • 4 waggons destroyed by Austrian hussars
  • 1 waggon destroyed by Austrian Grenzer
  •  1 waggon destroyed by Austrian infantry

Total 6 destroyed by Austrians

 Minor Prussian victory - Prussians held the field with the majority of the waggon train.

Lessons learnt

Would I do it again...yes but it was a surprising amount of work, writing updates to the players and taking pictures to share with them.  Especially as the pictures had to be shrunk down in size before I posted them on-line.  (I must have taken 150+ pictures and shared ~50 with the players.

If I did it again I'd certainly make sure both players could send and receive my posts before I started the battle.


Saturday 11 April 2020

Battle of Prague, South Flank - 05 Jun 1757 - Blucher

I've always liked the battle for Prague in the Seven Years War, the sides are reasonable even and the south flank of the battle had both a  great cavalry battle and a fight for a town. What better way to spend a Easter weekend in isolation  than fight a solo re-enactment in 6mm using modified Blucher rules?

As I was using Blucher I could have refought the whole battle on my 6' gaming table using the Blucher scale of one unit representing a brigade.  However I did this a few weeks ago and thought I preferred the idea of seeing 5 regiments of cuirassiers and 2 dragoons facing of against 4 cuirassiers and 4 dragoons with another 12 regiments in reserve.  The sight of 28 cavalry regiments (bases) was just going to be much more fun than 10 brigade (bases).

I don't a big enough table to fight the battle at 1 base per battalion scale but the south end of the battle field was the interesting end anyway.  I therefore went with about 40 units per side representing the south end of the battlefield.  Click here for the unit list.

As I was playing solo I decided to use some Blucher Solo rules which were recommended to me on the Blucher Facebook site. The called for me to play the defending side and to keep to my half of the battle field while the  AI ran the attackers, Prussians in this case.


A view of the battlefield looking north.  Lake Zinten is in the foreground and the string of marshland and fishponds run up the right flank.  The village of Sterbohol in the centre. The Austrians are on the left (west) and the Prussians on the right (east).

The AI divided the battlefield in to three sections (right, centre and left).   My choice would have been to start the attack with the Prussian left flank however the AI opted to lead the attack with the Prussian right flank. (Sorry about the shadow in the picture, it was a sunny day.)

Twelve battalions of Prussians marched forward, flags flying and drum beating...straight in to the teeth of the waiting Austrian volleys.  


The Austrian resistance was strong and the AI called for a general retreat and the Prussians came back worse for wear.  


The AI's next plan was a central assault which did ok but wasn't going to win the battle. The Austrian cuirassiers bounced off the Prussian Musketeers a few times but wore themselves out.


The centre attach wasn't getting very far until the Prussian reserves arrive on their left flank. Forty squadrons of Hussars and five squadrons of dragoons (9 units).

The Austrian right flank cavalry were just about to get worried when the Austrian reserves turned up on the same flank and a huge cavalry battle ensured.  About 26 cavalry regements, roughly 130 squadrons.


The Austrians just managed to win.  Mainly due to the Prussian cavalry reserve being mostly hussars (light cavalry).  If the Prussian's  had battle cavalry the outcome would have been different.  As it was the Austrians managed to drive off the Prussian hussars and shake their infantry out into a line.


Meanwhile the AI decided that things were not going well in the centre and rather than call a retreat it  had a new infantry battalion appear in the centre and a cuirassier regiment appear on the flank of the Austrian forces in the centre. (Must have been hidden in the smoke).

Alas too little, too late and the game had reached turn 30 and therefore the end of the day.  The Austrians won as the Prussians were not able to defeat them.  Yay for me!   But wait the battle was in June, there would have been more daylight...I decided to fight on 5 more turns.  Which was not good news for the flanked Austrian troops in the centre.

The battalion in the bottom of the picture below is an Austrian musketeer battalion hit in the front and flank by two Prussian cuirassier regiments!

The battle went down hill very quickly after that, from the Austrian point of view.  The entire centre was smashed and the battle field split into two.  It was at this point that I realised the Prussians has won in the last turn by taking the Austrian army to their break point.   

In the view of the south end of the battle field below you can see the Prussian left flank and Austrian right were still battling on although with heavy casualties but the centre is bare except for Prussian units.

I had been defeated by an AI!  How sad to be unable to win a solo game :)

Saturday 28 March 2020

6mm Basing


I'm in the process of converting my friends to the joy of six.  They all enjoy the visual impact of big battles fought on reasonable sized tables but one of the challenges of 6mm is telling troops apart especially if you don't have great eyesight or are unfamiliar with the troops or period.  To help us we have adopted a few basic conventions which allow us to differentiate troops at a glance from across a battlefield.

Line Infantry are based on 60x30mm. Twenty four models in two ranks.

Elite Infantry, such as Grenadiers, Twenty four models in three ranks or as line infantry but with a mounted officer.


Guns are based on 30x30mm, one gun model per base

Heavy and superior horse, such as Cuirassiers and Horse Grenadiers, are based on 60mmx30mm, nine models with one or two figures in the front rank. 

Horse, such as Dragoons, are based on 60x30mm. Nine models in a single rank.

Hussars and other light cavalry, are based on  60x30mm. Five to seven models in an open formation.

Grenze and other light infantry such as Fri corps, are based on 60x30mm. Five to seven models in an open formation.

and finally...Generals are based on round bases between 20-40mm. Two models for "divisional" commanders, three for "corps/Army". All mounted figures for cavalry commands and mixed for foot.

The overall effect...Dragoons rear right, Horse read left, line infantry in the centre and grenadiers/elite in the foreground.  All does without any knowledge of  French SYW troops.

French Seven Years War


Seven years War French Army 6mm. Figures from Baccus

Based with magnetic MDF bases from Tiny Tin Troops, with homemade flags.

Eight French line battalions, four grenadier battalions, five horse, three dragoons and two guns.

Army


Foot


Horse

 Guns